Introduction to building shiny apps with {rhino}

Welcome!
Ms. Rory Chen
Manager of Dementias Platform Australia (DPAU)
Centre for Healthy Brain Ageing (CHeBA)
Discipline of Psychiatry & Mental Health
School of Clinical Medicine, UNSW Medicine & Health
DPAU: https://www.dementiasplatform.com.au
LinkedIn: https://www.linkedin.com/in/rorychenxy

Pre-requisites
Comfortable with simple operations in R and R Studio
No prior knowledge of Shiny apps required.
Install the {shiny} and {rhino} package if you haven’t already
Today’s topic
The workshop will run for 1 hour (recorded).
What is
Rhino?Real-world R Shiny App Demo to inspire your own
Slides + Coding Example + Exercise
Ask questions!
What is Shiny?
✨Shiny is a framework for creating interactive web applications using R code.
UI (User Interface): How your app looks
Server: How your app works
Reactivity: User changes input controls → updates output (via server function)
https://rorychenxy.github.io/shiny-workshops/slides/intro-to-shiny.html
What is Rhino?
🦏Rhino is an Enterprise-grade framework for building Shiny applications
Developed by Appsilon https://appsilon.github.io/rhino/
Opinionated framework with proven industry experience
Modern software engineering practices
Why Rhino?
Clear Code (modules, file structures)
Quality Check
Automation
We will see details later 😎.
Dementias Platform Australia (DPAU)
Led: UNSW Sydney’s Centre for Healthy Brain Ageing (CHeBA)Partnership:- Dementias Platform UK (DPUK)
- Alzheimers Diseases Data Initiative (AD Data Initiative)
Funding support:- National Institute of Health (NIH)
- Australian Research Data Commons (ARDC)

Real-world R Shiny App Demo - GLADSE
Accelerate the progress in dementia research
Transform the epidemiology of ageing and dementia
Global Ageing and Dementia Study Explorer (
GLADSE) https://portal.dementiasplatform.com.au/crs-metadata-explorer
GLADSE File Structure
~/gladse
├── app
│   ├── data
│   │   ├── crsdir_df.fst
│   │   ├── crslist.fst
│   │   ├── csurvone_df.fst
│   │   ├── csurv_filter.fst
│   │   ├── csurv_matrix.fst
│   │   ├── filter_df.fst
│   │   ├── map_filter.rda
│   │   ├── measurement_inv.fst
│   │   ├── meta_filter.fst
│   │   ├── repolist.fst
│   │   └── varinfo.fst
│   ├── js
│   │   └── index.js
│   ├── logic
│   │   ├── footer.R
│   │   ├── value_map.R
│   │   ├── vlabel.R
│   │   └── __init__.R
│   ├── main.R
│   ├── static
│   │   ├── favicon.ico
│   │   └── images
│   ├── styles
│   │   └── main.scss
│   └── view
│       ├── connect_map.R
│       ├── crs_directory.R
│       ├── crs_filters.R
│       ├── csurv_matrix.R
│       ├── dt_table.R
│       ├── map_filter.R
│       ├── repo.R
│       ├── stmt.R
│       └── __init__.R
├── app.R
├── config.yml
├── dependencies.R
├── gladse.Rproj
├── renv
│   ├── activate.R
│   ├── library
│   │   └── windows
│   ├── settings.json
│   └── staging
├── renv.lock
├── rhino.yml
├── rsconnect
│   └── shinyapps.io
│       ├── dpau
└── tests
    ├── cypress
    │   └── e2e
    ├── cypress.config.js
    └── testthat
        └── test-main.R
Clear Code - Organized File Structure
app/main.R- Application entry pointapp/logic/- Business logic (Shiny-independent)app/view/- UI components and modulesapp/static/- static like picsapp/styles/- CSS files
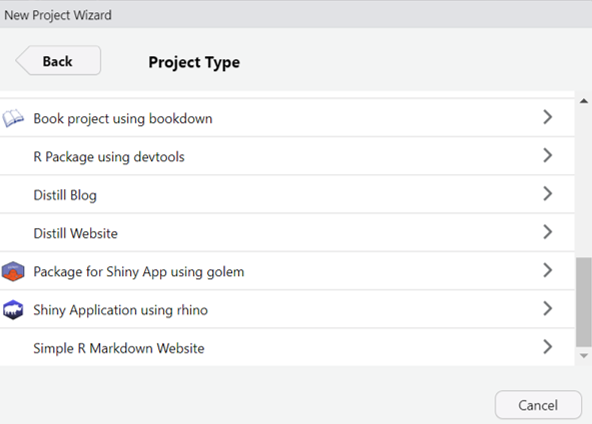
Exercise 1 – initiate [Step 1]
Create your rhino app with the New Project feature with R studio.
Exercise 1 - Setup [Step 2]
- Or Start your Rhino with
rhino::init("first-rhino-app") - Enable automatic reloading with
shiny::devmode(). - Run the app with
shiny::runApp(). - Check your project directory
Exercise 1 - Hello, World! [Step 3]
- Edit the displayed message in
app/main.R
box::use(
  shiny[bootstrapPage, div, moduleServer, NS, renderUI, tags, uiOutput],
)

#' @export
ui <- function(id) {
  ns <- NS(id)
  bootstrapPage(
    uiOutput(ns("message"))
  )
}

#' @export
server <- function(id) {
  moduleServer(id, function(input, output, session) {
    output$message <- renderUI({
      div(
        style = "display: flex; justify-content: center; align-items: center; height: 100vh;",
        tags$h1(
           tags$a("Hello, World! Check out Rhino docs!",
                  href = "https://appsilon.github.io/rhino/")
        )
      )
    })
  })
}
Exercise 1 - ns <- NS(id) [Step 3.5]
NS(id)is used in Shinymodulesto create anamespacefunction that helps
generate unique, namespaced IDs for inputs and outputs within the module.- Under
rhinoframework, in the UI, the ID must be wrapped inns(), but in the server the namespace is applied automatically. - Learn more in Modularizing Shiny app code
Exercise 1 - Hello[Step 4]
Try
shiny::runExample ("01_hello")We will convert a traditional shiny app into a modular Rhino app script
Check the traditional shiny app script: 01_hello.R
Complete the modular Rhino app script: 01_hello_rhino.R
Copy the syntax and create your
/app/view/hist.R
Why Rhino? - Clear Code
Scalable App Architecture
- Modularization with
{box}package - Shiny modules as building blocks
- Logic and view separation
Exercise 2 - View [Step 1]
- Call the ‘hist.R’ from your
main.Rwith the following syntax
Exercise 2 - View [Step 2]
- Copy the syntax: 02_hello_mod.R
- Create and update your
/app/view/hello.R - Call the ‘hello.R’ from your
main.R - See the app
# app/view/hello.R

box::use(
  shiny,
)

#' @export
ui <- function(id) {
  ns <- shiny$NS(id)
  shiny$div(
    shiny$h1("Hello, World!"),

    ## update the inputID with ns()
    shiny$textInput(inputId = ?,
                    label = "Your Name",
                    value = '',
                    placeholder = NULL),


    ## update the outputId with ns()
    shiny$textOutput(outputId = ?)
  )
}

#' @export
server <- function(id) {
  shiny$moduleServer(id, function(input, output, session) {
    # inputID & # outputId

    output$______ <- shiny::renderText({
      paste('Hello, ', input$_____, "!", sep = '')
    })
  })
}
Exercise 3 - Reverse word! - Logic[Step1]
Copy the following syntax: 03_reverse_logic.R
Create your
app/logic/reverse.R
Exercise 3 - Logic and View [Step2]
Refer to 03_reverse.R
Update your
app/view/hello.R- call the function at beginning
Add new output with reversed name in UI
Update the Server
Exercise 4 - Logic & Static [Step 1]
- Download the img folder into your
app/staticfolder - Refer to 04_const.R, create your
app/logic/const.R - Refer to 04_favorites.R, complete the script and create your
app/view/favorites.R
Exercise 4 - Logic & Static [Step 2]
- Update your
main.Rto call the ‘favorite’ module
box::use(
 # Call the const we defined
)

# Call the favorite module with different options

## UI
favorites$ui(ns("fruits"), category = "fruits", choices = const$fruits),
favorites$ui(ns("vege"), category = "vegetables", choices = const$vegetables),

## Server
favorites$server("fruits")
favorites$server("vege")
2. Quality ✅
- Unit Testing with
{testthat} - End-to-End Testing with Cypress https://appsilon.github.io/rhino/articles/tutorial/write-end-to-end-tests-with-cypress.html
- Code Linting for consistency
- Logging and Monitoring capabilities
- Type Safety with
{box}modules
3. Automation
- Project Initialization -
rhino::init() - CI/CD with GitHub Actions - Built-in workflows
- Dependency Management with
{renv} - Configuration Management with
{config}
Exercise 5 - Map filter!
Refer to this map filter app 05_mapfilter.R
# Packages -----
library(shiny)
library(leaflet)
library(spData)
library(dplyr)
library(sf)

# Prepare Data -----
data(world)
mapdata <- world |> mutate(country = name_long)

# UI -----
ui <- function(id) {
  shiny::fluidPage(
    shiny::wellPanel(shiny::actionButton("resetmap", "Reset Map")),
    leaflet::leafletOutput("mapfilter", height = 400),
    shiny::tags$h4("Selected countries:"),
    shiny::verbatimTextOutput("filtered_country")
  )
}

# Server -----
server <- function(input, output, session) {

    # Define reactive values
    rv <- shiny::reactiveValues(selected_countries = NULL, # Initialize reactive value for selected counties
                                last_click_id = NULL,
                                filtered_data = mapdata)


    shiny::observeEvent(input$mapfilter_shape_click, { # this is the logic behind the "click" of the map.

      click <- input$mapfilter_shape_click
      rv$last_click_id <- click$id
      ########## map behavior ################

      # If a country is clicked
      if (click$id %in% rv$selected_countries) {
        # If selected, remove it
        rv$selected_countries <- rv$selected_countries[rv$selected_countries != click$id]

      } else if(click$id == "selected"){ # when a county is clicked again it is removed

        rv$selected_countries <- rv$selected_countries[rv$selected_countries != tail(rv$selected_countries, n = 1)]

      }else {
        # If not selected, add it
        rv$selected_countries <- c(rv$selected_countries, click$id)
      }

      # Now update the leaflet
      leaflet::leafletProxy("mapfilter", session) |>
        leaflet::addPolygons(data = mapdata,
                             layerId = ~country,
                             label = ~country,
                             fillColor = ifelse(mapdata$country %in% rv$selected_countries, "#F47A60", "#7fe7dc"), # Change fill color based on selection
                             col = "#316879",
                             weight = 2,
                             fillOpacity = ifelse(mapdata$country %in% rv$selected_countries, 1, 0.5),
                             highlight = highlightOptions(
                               fillOpacity = 1,
                               bringToFront = TRUE)
        )

    })

    output$filtered_country <- shiny::renderPrint({
      paste(rv$selected_countries, collapse = ',')
    })

    # Leaflet
    output$mapfilter <- leaflet::renderLeaflet({ # rendering the filter map

      leaflet::leaflet() |>
        leaflet::addTiles() |> # The is the base map
        leaflet::addPolygons(data = mapdata,
                             color = '#316879',
                             weight = 1,
                             layerId = ~country,
                             label = ~country,
                             fillColor = "#7fe7dc",
                             fillOpacity = .5,
                             highlight = highlightOptions(
                               fillOpacity = 1,
                               bringToFront = TRUE
                             )) |>
        leaflet::setView(zoom = 1, lng = 0, lat =50)

    })

    # Reset the map filter
    shiny::observeEvent(input$resetmap, {

      rv$selected_countries <- NULL
      rv$last_click_id <- NULL
      rv$filtered_data <- mapdata

      leafletProxy("mapfilter", session) |>
        leaflet::addPolygons(data = mapdata,
                             color = '#316879',
                             weight = 1,
                             layerId = ~country,
                             label = ~country,
                             fillColor = "#7fe7dc",
                             fillOpacity = .5,
                             highlight = highlightOptions(
                               fillOpacity = 1,
                               bringToFront = TRUE
                             )) |>
        leaflet::setView(zoom = 1, lng = 0, lat =50)

    })


    # Return reactive values
    return(
      list(
        value = shiny::reactive(rv$selected_countries),
        filtered  = shiny::reactive(rv$filtered_data)
      )
    )

}


# Run the app -----
shinyApp(ui = ui, server = server)
Exercise 5 - Map filter to module
Can you convert it into a module?
Thank you & Questions?
